Black-and-white photographs have always been considered the “fine art” of photography. There are some collectors and purists who, for reasons that aren’t completely understood, think traditional black and white is the only true art form for photography. Personally, I’ve never believed that for a second. Besides, I personally like color, and I’m of the opinion that art is what you make of it. The most important question to ask yourself as a nature photographer is, why should I limit myself to either black and white or color? Do both!
As with a lot of the cool things you can do in Photoshop, converting a color digital image to a B&W image can be accomplished in a number of ways. I’m going to show you a few that I use. The first is a quickie method, using the Desaturate command. A second technique uses the Channel Mixer. A third method uses the Hue/Saturation adjustment layer to convert color photos to black and white. Each method has its own merits and its own uses.
TIP
Many digital cameras provide you with the ability to capture images in black-and-white mode. One of the advantages of shooting images with digital cameras and using Photoshop to process the images is the fact that you can have the best of both worlds— color and black and white. I suggest always shooting your images in color mode; you always have the option to convert any image to black and white later, when you’re processing the image in Photoshop.
Using the Desaturate Command to Convert to Black and White
Sometimes it’s best to take the path of least resistance. There are many ways to convert color images to blackand white, and there’s one little command that will allow you to do that quickly—the Desaturate command.
Here are the steps to that quick conversion:
1. Open a photo in Photoshop that you want to convert to black and white. Converting to black and white is a step that should be taken after all of your color, tonal, and image edits are made. Converting an image to black and white should be the next step in your workflow.
2. Create a new layer to use when you make your B&W conversion. Create a new layer by pressing Shift+Ctrl+Alt+E (Shift+Command+Option+E on a Mac). Name this new layer Desaturate.
3. Desaturate the image. Choose Image, Adjustments, Desaturate or press Shift+Ctrl+U (Shift+Command+U on a Mac).
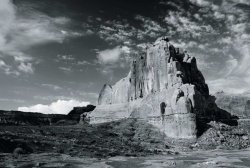
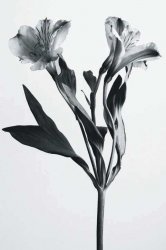
You’ll find that using this procedure to convert your image to B&W is about as easy as it comes. The Desaturate command simply converts the entire image to black and white, shown in the example in Figure 1
Figure 1
The Desaturate command is the quickest way to convert color images to black and white.
TIP
When converting color images to black and white, an important factor to consider is that you still have an RGB or CMYK image, not grayscale. Therefore, your printer will be using the whole spectrum of ink at its command to print gray. One printer might produce a pink-tinted print, and the next might produce a cool blue. By changing the image at some point to grayscale, you’re at least using only black (and gray, in some printers) ink.
Using the Hue/Saturation Adjustment to Convert to Black and White
The second method to convert color images to B&W involves the Hue/Saturation adjustment. I like to use this method to desaturate yellows, greens, blues, cyans, and magentas in a color image. I then use the Red Saturation control to add a little tone back into the image. By adding a little red back into the image, you get that “selenium toned” look (black-and-white photos with a brownish tone to them) to your converted B&W photos.
Here’s how to use this method:
1. Open a photo you want to convert to B&W. As in the Desaturate method, make sure you’ve made your tonal and color corrections before proceeding.
2. Create a new layer to use for the Hue/Saturation adjustment. Create a new layer by pressing Shift+Ctrl+Alt+E (Shift+Command+Option+E on a Mac). Name this new layer Hue-Saturation.
3. Desaturate colors. Click the Edit menu and select Yellows (Ctrl+2 on a PC and Command+2 on a Mac). In the Saturation control, move the Saturation slider all the way to a setting of 100 to remove the yellow color. Repeat this step for each of the other colors: greens, cyans, blues, and magentas. (You adjust the reds in the next step.)
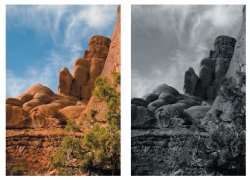
4. Desaturate the Red channel. Move the slider all the way to a setting of 100. Move the slider to the left slightly, until you obtain a toned effect. A setting of 70 to 40 usually gives me the toned effect I like in some of my B&W conversions. The photo, when converted to B&W as shown in Figure 2, is slightly toned with a Red-channel Saturation setting of 40.
Figure 2
Creating a B&W image with a selenium-toned appearance using the Hue/Saturation adjustment
Using the Channel Mixer to Convert to Black and White
The Channel Mixer is another method for converting color images into black and white. Use the Channel Mixer, remove color from your entire image, and then fine-tune the Red, Green, and Blue channels to obtain more control over the tones of the image you are converting. As a reminder, Photoshop always gives you many ways to obtain similar results, and using the Channel Mixer is another way to convert color images to B&W.
To use the Channel Mixer to make your conversion, follow these steps:
1. Open a photo in Photoshop that you want to convert to B&W. Process the photo as you would any other, making the color and tonal adjustments, and then the edits.
2. Create a new layer to use for the Channel Mixer. Create a new layer by pressing Shift+Ctrl+Alt+E (Shift+Command+Option+E on a Mac). Name this new layer Channel Mixer.
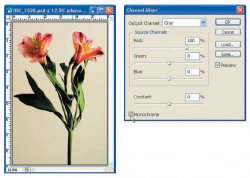
3. Start the Channel Mixer. Choose Image, Adjustments, Channel Mixer.
4. Click the Monochrome check box. Clicking the Monochrome check box immediately converts your image to black and white. Figure 3 shows the Monochrome check box and the Channel Mixer window.
Figure 3 Using the Channel Mixer to convert color images to black and white with finer tuning of color channels
5. Make adjustments to fine-tune the color channels. Make moderate adjustments to the Red, Green, and Blue channels in the Channel Mixer dialog box. You don’t need to move the Red, Green, or Blue sliders much. Most of the time, you’ll want to adjust the Red channel slightly to get the B&W effect you want.
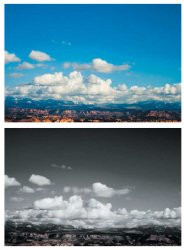
Experiment by moving each slider—Red, Green, and Blue—and you’ll probably find that only slight (or even no) adjustment gives you great results. Figure 4 shows the image converted using the Channel Mixer.
Figure 4 The image converted to black and white using the Channel Mixer
Selective Color Techniques
You might have seen black-and-white images in which only a portion of the image is in color. The technique to obtain selective color in Photoshop is actually very simple. I always get that “wow” factor when I show off my nature photos and mix in a few that are in black and white, with the exception of one portion of the image.
The technique is simple, and it’s almost the same as the previous technique that converts color to B&W, except that you save a selection in which to retain some color.
The process to selectively retain color in a black-and-white converted image is as follows:
1. Open a photo you want to convert to B&W while retaining a portion of the image with color. As in the previous methods to convert to black and white, make sure you’ve made your tonal and color corrections and any edits that are necessary.
2. Create a new layer you can use to make selections. Create a new layer by pressing Shift+Ctrl+Alt+E (Shift+Command+Option+E on a Mac). Name this new layer Selections.
3. Select a part of the image to remain in color. Using the selection techniques covered previously, select an area of the image where you want color to remain.
4. Duplicate the layer. Right-click (Ctrl+click on a Mac) on the active layer and choose Duplicate Layer. Name the new layer Convert to B&W.
5. Inverse the selection. Because I want to keep the color in the selected leaves, I choose Select, Inverse (or press Shift+Ctrl+I on a PC or Shift+Command+I on a Mac), which inverses the selection so the rest of the image will get converted to B&W.
6. Desaturate color. Choose Image, Adjustments, Hue/Saturation or press Ctrl+U (Command+U on a Mac). Desaturate the reds, greens, and blues by clicking on the Edit Selection box, choosing a color, and then proceeding to move the Saturation slider for each color all the way to the left.
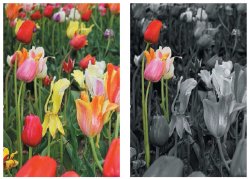
7. Adjust contrast by using the Curves adjustment. Figure 5 shows the original image, and then the image converted to black and white with selective color remaining.
Figure 5 Image converted to black and white with selective color remaining TIP
If you shoot your images in raw format and use Camera Raw to convert your photos, you can skip some of the black-and-white conversion steps by doing your conversion in Camera Raw. In Camera Raw, all you have to do is make all of your tonal and color adjustments like you usually make them, and then move the Saturation slider to the left to desaturate the color in the image. When you’re finished, just click the Open button to open your image in Photoshop.
TIP
Many digital cameras provide you with the ability to capture images in black-and-white mode. One of the advantages of shooting images with digital cameras and using Photoshop to process the images is the fact that you can have the best of both worlds— color and black and white. I suggest always shooting your images in color mode; you always have the option to convert any image to black and white later, when you’re processing the image in Photoshop.
Using the Desaturate Command to Convert to Black and White
Sometimes it’s best to take the path of least resistance. There are many ways to convert color images to blackand white, and there’s one little command that will allow you to do that quickly—the Desaturate command.
Here are the steps to that quick conversion:
1. Open a photo in Photoshop that you want to convert to black and white. Converting to black and white is a step that should be taken after all of your color, tonal, and image edits are made. Converting an image to black and white should be the next step in your workflow.
2. Create a new layer to use when you make your B&W conversion. Create a new layer by pressing Shift+Ctrl+Alt+E (Shift+Command+Option+E on a Mac). Name this new layer Desaturate.
3. Desaturate the image. Choose Image, Adjustments, Desaturate or press Shift+Ctrl+U (Shift+Command+U on a Mac).
You’ll find that using this procedure to convert your image to B&W is about as easy as it comes. The Desaturate command simply converts the entire image to black and white, shown in the example in Figure 1
Figure 1
The Desaturate command is the quickest way to convert color images to black and white.
TIP
When converting color images to black and white, an important factor to consider is that you still have an RGB or CMYK image, not grayscale. Therefore, your printer will be using the whole spectrum of ink at its command to print gray. One printer might produce a pink-tinted print, and the next might produce a cool blue. By changing the image at some point to grayscale, you’re at least using only black (and gray, in some printers) ink.
Using the Hue/Saturation Adjustment to Convert to Black and White
The second method to convert color images to B&W involves the Hue/Saturation adjustment. I like to use this method to desaturate yellows, greens, blues, cyans, and magentas in a color image. I then use the Red Saturation control to add a little tone back into the image. By adding a little red back into the image, you get that “selenium toned” look (black-and-white photos with a brownish tone to them) to your converted B&W photos.
Here’s how to use this method:
1. Open a photo you want to convert to B&W. As in the Desaturate method, make sure you’ve made your tonal and color corrections before proceeding.
2. Create a new layer to use for the Hue/Saturation adjustment. Create a new layer by pressing Shift+Ctrl+Alt+E (Shift+Command+Option+E on a Mac). Name this new layer Hue-Saturation.
3. Desaturate colors. Click the Edit menu and select Yellows (Ctrl+2 on a PC and Command+2 on a Mac). In the Saturation control, move the Saturation slider all the way to a setting of 100 to remove the yellow color. Repeat this step for each of the other colors: greens, cyans, blues, and magentas. (You adjust the reds in the next step.)
4. Desaturate the Red channel. Move the slider all the way to a setting of 100. Move the slider to the left slightly, until you obtain a toned effect. A setting of 70 to 40 usually gives me the toned effect I like in some of my B&W conversions. The photo, when converted to B&W as shown in Figure 2, is slightly toned with a Red-channel Saturation setting of 40.
Figure 2
Creating a B&W image with a selenium-toned appearance using the Hue/Saturation adjustment
The Channel Mixer is another method for converting color images into black and white. Use the Channel Mixer, remove color from your entire image, and then fine-tune the Red, Green, and Blue channels to obtain more control over the tones of the image you are converting. As a reminder, Photoshop always gives you many ways to obtain similar results, and using the Channel Mixer is another way to convert color images to B&W.
To use the Channel Mixer to make your conversion, follow these steps:
1. Open a photo in Photoshop that you want to convert to B&W. Process the photo as you would any other, making the color and tonal adjustments, and then the edits.
2. Create a new layer to use for the Channel Mixer. Create a new layer by pressing Shift+Ctrl+Alt+E (Shift+Command+Option+E on a Mac). Name this new layer Channel Mixer.
3. Start the Channel Mixer. Choose Image, Adjustments, Channel Mixer.
4. Click the Monochrome check box. Clicking the Monochrome check box immediately converts your image to black and white. Figure 3 shows the Monochrome check box and the Channel Mixer window.
Figure 3 Using the Channel Mixer to convert color images to black and white with finer tuning of color channels
5. Make adjustments to fine-tune the color channels. Make moderate adjustments to the Red, Green, and Blue channels in the Channel Mixer dialog box. You don’t need to move the Red, Green, or Blue sliders much. Most of the time, you’ll want to adjust the Red channel slightly to get the B&W effect you want.
Experiment by moving each slider—Red, Green, and Blue—and you’ll probably find that only slight (or even no) adjustment gives you great results. Figure 4 shows the image converted using the Channel Mixer.
Figure 4 The image converted to black and white using the Channel Mixer

You might have seen black-and-white images in which only a portion of the image is in color. The technique to obtain selective color in Photoshop is actually very simple. I always get that “wow” factor when I show off my nature photos and mix in a few that are in black and white, with the exception of one portion of the image.
The technique is simple, and it’s almost the same as the previous technique that converts color to B&W, except that you save a selection in which to retain some color.
The process to selectively retain color in a black-and-white converted image is as follows:
1. Open a photo you want to convert to B&W while retaining a portion of the image with color. As in the previous methods to convert to black and white, make sure you’ve made your tonal and color corrections and any edits that are necessary.
2. Create a new layer you can use to make selections. Create a new layer by pressing Shift+Ctrl+Alt+E (Shift+Command+Option+E on a Mac). Name this new layer Selections.
3. Select a part of the image to remain in color. Using the selection techniques covered previously, select an area of the image where you want color to remain.
4. Duplicate the layer. Right-click (Ctrl+click on a Mac) on the active layer and choose Duplicate Layer. Name the new layer Convert to B&W.
5. Inverse the selection. Because I want to keep the color in the selected leaves, I choose Select, Inverse (or press Shift+Ctrl+I on a PC or Shift+Command+I on a Mac), which inverses the selection so the rest of the image will get converted to B&W.
6. Desaturate color. Choose Image, Adjustments, Hue/Saturation or press Ctrl+U (Command+U on a Mac). Desaturate the reds, greens, and blues by clicking on the Edit Selection box, choosing a color, and then proceeding to move the Saturation slider for each color all the way to the left.
7. Adjust contrast by using the Curves adjustment. Figure 5 shows the original image, and then the image converted to black and white with selective color remaining.
Figure 5 Image converted to black and white with selective color remaining TIP
If you shoot your images in raw format and use Camera Raw to convert your photos, you can skip some of the black-and-white conversion steps by doing your conversion in Camera Raw. In Camera Raw, all you have to do is make all of your tonal and color adjustments like you usually make them, and then move the Saturation slider to the left to desaturate the color in the image. When you’re finished, just click the Open button to open your image in Photoshop.
No comments:
Post a Comment