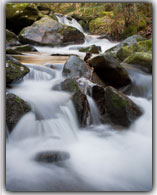

Smooth water really accents the moss, making it appear more lush and green.
Photo By Sean McGrath
The effect above is known as a motion blur. You’ve probably encountered motion blurs before, and I can almost assure you that the result wasn’t pleasant. Most motion blur effects are unintentional. You shake the camera while taking a picture, and the photo comes out blurred. You soon learn to stop shaking the camera so much.
But what causes the effect? Blurring, at its heart, is caused by using a shutter speed that isn’t fast enough to freeze motion. When the camera’s shutter is open longer, it takes in light from objects moving across its path. As they move, they reflect more light onto the sensor, much like a paintbrush applies paint to a canvas.
If you were to allow a painter to paint a line across a canvas for 1/500 of a second, you wouldn’t see a line at all. You’d probably see a dot (assuming his hand could get to the canvas in the first place). However, if you were to give that same painter as little as 3 seconds to paint, you would most certainly see a line. That’s what it’s like for a camera. The line is a single direction motion blur.
To create a motion blur and get blurred waterfalls, we need to use a slower shutter speed. We need to allow the waterfall to paint it onto the sensor. Something in the range of 1 to 5 seconds should work. In some cases, you might need to use a shutter speed a little bit above or below that.
What else do you need?
Let’s go back to our painter. If you were to shake the entire canvas while the painter is painting the line, you wouldn’t get a straight line would you? That’s exactly what happens when you shoot at slower shutter speeds without a tripod. Your hands shake the camera ever so slightly, and everything in the photo (not just the waterfall) appears blurred.
To cut to the chase, you need a tripod.
Any tripod will do. You can even create a “natural” tripod out of rocks and ledges you find nearby. Your image doesn’t need to be perfectly cropped out of the camera. Unlike the horrific blur from camera shake, you can always adjust that later with software like Photoshop Elements.
When and where do you need to be?
This particular photo doesn’t work so well in the middle of the day. There’s a reason for that. When you open the shutter for a long period of time, you’re allowing a lot of light in. If there’s already a lot of light outside, it’s going to get into your camera pretty fast. In short, you’ll end up with a picture that’s just too bright. Other camera settings (see below) can help to mitigate this problem, but it all comes down to there being too much available light.

An example of what can happen when you attempt to blur a waterfall in broad daylight. Notice the loss of detail in the trees and the sky. It’s completely white.
Photo By: Diesel Demon
Ways to Let Less Light Into Your Camera
Pick shady areas. Pick forested spaces. Shoot sometime around the sunrise or sunset. That’s when it’s more beautiful anyway. Get up early and head out there. It’s well worth doing, even if you don’t take away any good photos.
You can also increase you aperture’s f-number and decrease your ISO. Both help to allow less light into your camera. The aperture is the hole in your lens, and when you increase its f-number, the hole shrinks reducing the amount of light getting in. By decreasing the ISO, you’re making your sensor less sensitive to light, so it takes more light create an image of the same brightness. Consider these options when the resulting image is still too bright.
Confused about apertures, ISO speeds, and manual photography? Just take the picture in shutter priority mode.
Shutter priority mode is the next best thing if you don’t know manual for these shots. It allows you to adjust the shutter speed while the camera takes care of the rest. By switching to shutter priority mode, you can pick a slow shutter speed for the shot, and the camera will pick the aperture and ISO speeds accordingly. It simplifies the process and helps you focus on the most important aspects of taking this particular type of photo.
 You can find shutter priority mode on your camera’s top dial. It is usually labeled “S” or “Tv” in nice big bold letters. To adjust the shutter speed, you flick the back dial left or right. It might be different depending on the camera you’re using, but that is the standard.
One last thing. Do a lot of experimentation. You really won’t know if you’ve got a killer waterfall until you see it on your computer screen (why? Your LCD lies!). Unless you’ve got your laptop with you, you’ll want to take a bunch of different pictures at different shutter speeds. Take enough, and one of them will have the look you’re trying to achieve.
No comments:
Post a Comment